Django中Celery定时任务的实现
配置Djcelery
主要步骤
- 在settings配置相关参数
- 定义任务
- 执行任务,可以在程序中调用执行,也可交给后台周期性执行
1) Django项目的settings模块配置
|
1 2 3 4 5 6 7 8 9 10 11 12 13 14 15 |
|
|
1 2 3 4 5 6 7 8 9 10 11 12 13 14 15 16 17 18 19 20 21 22 23 24 25 26 27 28 29 30 31 32 33 34 35 36 37 38 39 |
|
CELERY_IMPORTS这个引用自己定义的任务,本文是设置在app名为monitor_agent的my_celery下的tasks.py
官方配置项介绍 http://docs.celeryproject.org/en/latest/userguide/configuration.html
2)编写tasks.py文件中的函数,如下例
|
1 2 3 4 5 6 7 |
|
3)同步数据库
python manage.py makemigrations
python manage.py migrate
在数据库中生成几张表
可以通过django的admin页面进行数据创建
启动 /usr/bin/python manage.py celerycam --loglevel=INFO
admin后台查看 woker是不是在线
当worker可以监控后,在admin后台tasks表中可以查看每次任务的执行状态
或者自己导入from djcelery import models as celery_models,通过它提供的Model Query API来操作,同平常的数据库查询一样。
4)启动
官网 http://docs.celeryproject.org/en/latest/userguide/workers.html
启动 python manage.py celery worker -l info
如果有定时任务的话,还需要启动心跳 python manage.py celery beat
celery worker --help 启动参数帮助命令
celery beat --help 启动参数帮助命令
Django中Celery的定时任务集群部署
1)以两台主机为例,通过django创建2个app,名称为net_celery,local_celery,它们的task不同
2)net_celery部署在一台主机,settings配置
worker程序启动指定hostname和queue
|
1 |
|
admin页面配置,需要将queue、exchange指定
3)local_celery部署在一台主机,settings配置
worker程序启动指定hostname和queue,注意与上面一台不一样
|
1 |
|
admin页面配置,需要将queue、exchange指定
4)启动celery beat和celerycam
备注:两个进程只需要在一台主机上启动,不要启动多,如果启动多个,会出现同一个task多次执行。
|
1 |
|
|
1 |
|
来源:网络
智能推荐
Django-apscheduler实现定时任务
Django-apscheduler配置简单、功能齐全、使用灵活,支持window和linux,适合中小型项目。 准备: 1、安装:pip install django-apscheduler pip install apscheduler 2、在settings注册app: 3、注册后数据迁移:python manage.py migrate 迁移后会生成两张表: django_apschedu...

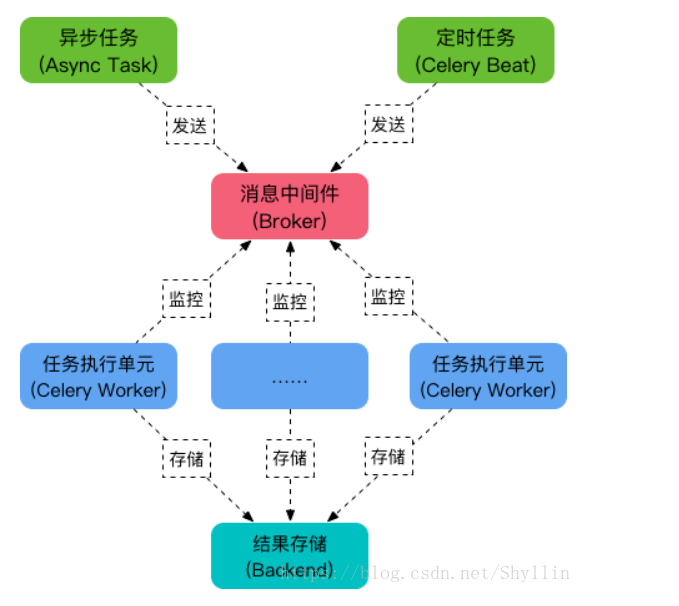
Celery 异步任务、定时任务
celery介绍 Celery是一个功能完备即插即用的任务队列。它使得我们不需要考虑复杂的问题,使用非常简单。celery看起来似乎很庞大,本章节我们先对其进行简单的了解,然后再去学习其他一些高级特性。 celery适用异步处理问题,当发送邮件、或者文件上传, 图像处理等等一些比较耗时的操作,我们可将其异步执行,这样用户不需要等待很久,提高用户体验。 celery的特点是: 简单,易于使用和维护,...

Celery定时任务|计划任务
适用场景几点几分执行特定的任务 定时任务 配置这个无需多说了和上篇文章一样 任务函数 硬菜来了 添加任务时候的写法 第一种: 这里面需要把时间转化成utc时区的时间,不然间隔十小时,自己推算即可 唯一变的就是传递参数的调用变成了apply_async(args=[参数,参数],eta=执行任务的时间) worker日志 接收到任务到时间 16:52:17 任务执行完成的时间 16:5...
Celery定时任务&异步任务
celery定时任务 Celery 是一个强大的分布式任务队列,它可以让任务的执行完全脱离主程序,甚至可以被分配到其他主机上运行。我们通常使用它来实现异步任务( async task )和定时任务( crontab )。 异步任务比如是发送邮件、或者文件上传, 图像处理等等一些比较耗时的操作 ,定时任务是需要在特定时间执行的任务。它的架构组成如下图: 任务队列 任务队列是一种跨线程、跨机器工作的一...

Django定时任务
Django定时任务 安装 配置 设置任务的定时开启时间 在配置文件中设置定时执行的时间 每个定时任务分为三部分定义: 任务时间 任务方法 任务日志 首页的定时任务设置如下 解决中文字符问题 在定时任务中,如果出现非英文字符,会出现字符异常错误 可以通过在配置文件中添加定时任务执行的附加命令来实现: 开启定时任务 我们设置好定时任务之后, 需要把定时任务添加到操作系统中才能够启动: 添加定时任务到...
猜你喜欢
Django定时任务
Django中超级简单的定时任务 settings.py中INSTALLED_APPS中加入django_crontab 并创建CRONJOBS = [(‘0 */1 * * *’, ‘wechat.corn.get_token’)],前边是设置任务定时执行时间,后边是指定要直行的任务路径,我的是在wechat子应用下一个叫corn.py的文件中写了...

Python Celery , 定时任务 crontab介绍
Python Celery , 定时任务 crontab介绍 简介:什么是 Celery Celery 是一个简单、灵活且可靠的,处理大量消息的分布式系统,并且提供维护这样一个系统的必需工具。 我们通常使用它来实现异步任务(async task)和定时任务(crontab) 大致原题图 Celery Beat:任务调度器,Beat进程会读取配置文件的内容,周期性地将配置中到期需要执行的任务发送给任...
利用celery+django 在admin后台设置定时任务
经常用python开发web应用时,会涉及到定时任务的脚本,以前用linux自带的crontab来操作,但是感觉不太接地气,后来发现用celery+django 可以方便的实现! 安装软件环境如下: python 2.7.5 Django==1.8.2 celery==3.1.18 celery-with-redis==3.0 django-celery==3.1.16 MySQL-python=...

Celery - 一个懂得 异步任务 , 定时任务 , 周期任务 的芹菜
1.什么是Celery? Celery 是芹菜 Celery 是基于Python实现的模块, 用于执行异步定时周期任务的 其结构的组成是由 1.用户任务 app 2.管道 broker 用于存储任务 官方推荐 redis rabbitMQ / backend 用于存储任务执行结果的 &n...
Django 前端发送定时任务时间+Apscheduler 后端接收时间 实现定时任务
首先偶作开始想要的功能是前端发送一个执行任务的时间,后端收到时间后执行。百度了一圈文章不是转载就是抄!!最开始选的是Apscheduler, 搞了1天没有实现要的功能,然后试了试celery …我只能说功能多但是复杂(还难用)需要启动很多的监听工具。 说说我的实现步骤: 1.前端. 用的bootstrap的一个插件datetimepicker 第一个为选择到一个时间后执行任务,第二个...
问答精选
Upgrade PostgreSQL from 9.6 to 10.0 on Ubuntu 16.10
My database is over 600 GB and my current volume is only 1 TB, so that probably limits my options. My config files are here: My database is here: Edit - This guide worked for me. The only addition I n...
JSONTypeInfo to not ignore property in inheritance mapping
I am using following dependency for JSON serialization/deserialization I have inheritance mapping. Following is Parent class. And we have two sub class One and Two extended by Parent. This mapping is ...
IOError: [Errno 2] No such file or directory: '123.avi'
I´m writting a script to send emails form a raspberry pi 4 and I want to attach a file to an email via python, but i always get this error. I´m pretty new to python. I know that the file i...
pthread_join fails in forking TCP server when handling multiple clients
I have to create a multithread TCP/IP server which contains a variable to count the number of clients connected (and those which disconnect) and print the number of clients connected when a client con...
Update corresponding object on multiple jquery ajax requests
I have an array of objects I would like to initiate an ajax request for each, and the result of that request should be stored in the corresponding object for that request say I have what is the proper...
相关问题
相关文章
热门文章
推荐文章
相关标签
推荐问答
- JavaScript works fine when pasted in to console, not as bookmark
- Powershell duplicating file information
- Problem with obtaining GET all athlete activities in Strava API v3
- Getting unknown value on Y axis while plotting barplot(Geom_Col)
- PyQt QProgressBar not working correctly due to Python docstring comment length?
- Quarkus startup is complaining about deprecated properties
- Spaghetti plot in R with repeated measurements
- Laravel Simultaneously input one to many in database
- Protractor webdriver-manager error: "WebDriverError: Unable to determine type from: E. Last 1 characters read: E"
- Amazon AWS cost of small basic web