How To Install MySQL on CentOS 7
Introduction
MySQL is an open-source database management system, commonly installed as part of the popular LEMP (Linux, Nginx, MySQL/MariaDB, PHP/Python/Perl) stack. It uses a relational database and SQL (Structured Query Language) to manage its data.
CentOS 7 prefers MariaDB, a fork of MySQL managed by the original MySQL developers and designed as a replacement for MySQL. If you run yum install mysql on CentOS 7, it is MariaDB that is installed rather than MySQL. If you’re wondering about MySQL vs. MariaDB, MariaDB will generally work seamlessly in place of MySQL, so unless you have a specific use-case for MySQL, see the How To Install MariaDB on Centos 7 guide.
This tutorial will explain how to install MySQL version 5.7 on a CentOS 7 server.
Prerequisites
To follow this tutorial, you will need:
A CentOS 7 with a non-root user with sudo privileges. You can learn more about how to set up a user with these privileges in the Initial Server Setup with CentOS 7 guide.
Step 1 — Installing MySQL
As mentioned in the introduction, the Yum command to install MySQL in fact installs MariaDB. To install MySQL, we’ll need to visit the MySQL community Yum Repository which provides packages for MySQL.
In a web browser, visit:
https://dev.mysql.com/downloads/repo/yum/
Note that the prominent Download links don’t lead directly to the files. Instead, they lead to a subsequent page where you’re invited to log in or sign up for an account. If you don’t want to create an account, you can locate the text “No thanks, just start my download”, then right-click and copy the link location, or you can edit the version number in the commands below.
Locate the desired version, and update it as needed in the link below:
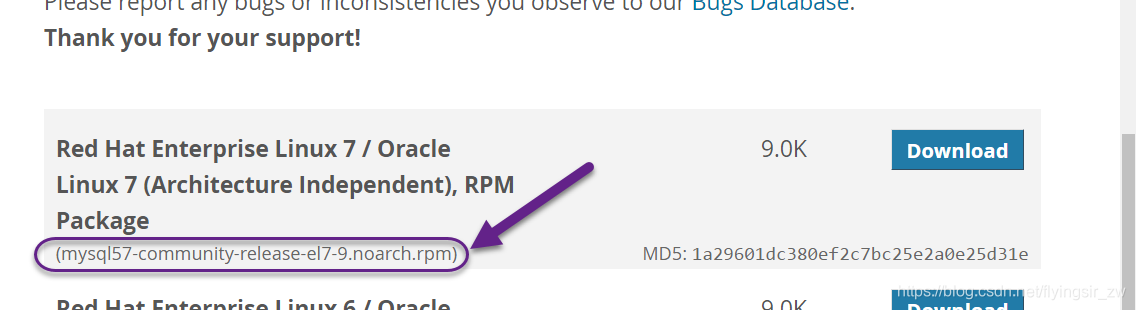
Screencapture highlighting current yum repo name
wget https://dev.mysql.com/get/mysql57-community-release-el7-9.noarch.rpm
Once the rpm file is saved, we will verify the integrity of the download by running md5sum and comparing it with the corresponding MD5 value listed on the site:
md5sum mysql57-community-release-el7-9.noarch.rpm
Output
1a29601dc380ef2c7bc25e2a0e25d31e  mysql57-community-release-el7-9.noarch.rpm
Compare this output with the appropriate MD5 value on the site:
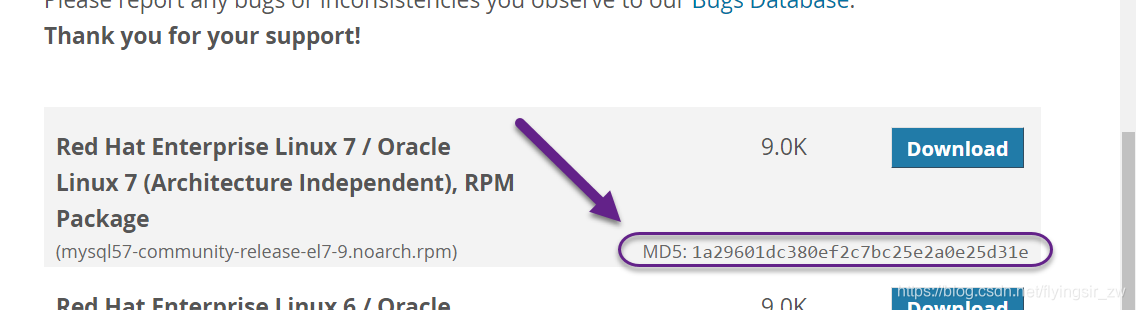
Screencapture highlighting md5dsum
Now that we’ve verified that the file wasn’t corrupted or changed, we’ll install the package:
sudo rpm -ivh mysql57-community-release-el7-9.noarch.rpm
This adds two new MySQL yum repositories, and we can now use them to install MySQL server:
sudo yum install mysql-server
Press y to confirm that you want to proceed. Since we’ve just added the package, we’ll also be prompted to accept its GPG key. Press y to download it and complete the install.
- Step 2 — Starting MySQL
We’ll start the daemon with the following command:
sudo systemctl start mysqld
systemctl doesn’t display the outcome of all service management commands, so to be sure we succeeded, we’ll use the following command:
sudo systemctl status mysqld
If MySQL has successfully started, the output should contain Active: active (running) and the final line should look something like:
Dec 01 19:02:20 centos-512mb-sfo2-02 systemd[1]: Started MySQL Server.
Note: MySQL is automatically enabled to start at boot when it is
installed. You can change that default behavior withsudo systemctl disable mysqld
During the installation process, a temporary password is generated for the MySQL root user. Locate it in the mysqld.log with this command:
sudo grep 'temporary password' /var/log/mysqld.log
Output
2016-12-01T00:22:31.416107Z 1 [Note] A temporary password is generated for root@localhost: mqRfBU_3Xk>r
Make note of the password, which you will need in the next step to secure the installation and where you will be forced to change it. The default password policy requires 12 characters, with at least one uppercase letter, one lowercase letter, one number and one special character.
- Step 3 — Configuring MySQL
MySQL includes a security script to change some of the less secure default options for things like remote root logins and sample users.
Use this command to run the security script.
sudo mysql_secure_installation
This will prompt you for the default root password. As soon as you enter it, you will be required to change it.
Output The existing password for the user account root has expired.
Please set a new password.
New password:
Enter a new 12-character password that contains at least one uppercase letter, one lowercase letter, one number and one special character. Re-enter it when prompted.
You’ll receive feedback on the strength of your new password, and then you’ll be immediately prompted to change it again. Since you just did, you can confidently say No:
yes
Output Estimated strength of the password: 100 Change the password for
root ? (Press y|Y for Yes, any other key for No) :
yes
After we decline the prompt to change the password again, we’ll press Y and then ENTER to all the subsequent questions in order to remove anonymous users, disallow remote root login, remove the test database and access to it, and reload the privilege tables.
Now that we’ve secured the installation, let’s test it.
- Step 4 — Testing MySQL
We can verify our installation and get information about it by connecting with the mysqladmin tool, a client that lets you run administrative commands. Use the following command to connect to MySQL as root (-u root), prompt for a password (-p), and return the version.
mysqladmin -u root -p version
You should see output similar to this:
Output
mysqladmin Ver 8.42 Distrib 5.7.16, for Linux on x86_64
Copyright 2000, 2016, Oracle and/or its affiliates. All rights
reserved.Oracle is a registered trademark of Oracle Corporation and/or its
affiliates. Other names may be trademarks of their respective owners.Server version 5.7.16 Protocol version 10 Connection
Localhost via UNIX socket UNIX socket
/var/lib/mysql/mysql.sock Uptime: 2 min 17 secThreads: 1 Questions: 6 Slow queries: 0 Opens: 107 Flush tables: 1
Open tables: 100 Queries per second avg: 0.043 This indicates your
installation has been successful.
Conclusion
In this tutorial, we’ve installed and secured MySQL on a CentOS 7 server. To learn more about using MySQL, this guide to learning more about MySQL commands can help. You might also consider implementing some additional security measures.
来源:网络
智能推荐

How to install Nvidia drivers in CentOS 7 - Tutorial
How to install Nvidia drivers in CentOS 7 - Tutorial Updated: September 6, 2014 All right, let's do it. A few weeks back, I tested CentOS 7, and it did not really impress me. It had sim...


How to install php evn on ubuntu
1. How to install PHP EVN 打开终端,也就是命令提示符。 我们先来最小化组建安装,按照自己的需求一步一步装其他扩展。命令提示符输入如下命令: 1 sudo apt-get install apache2 php5-mysql libapache2-mod-php5 mysql-server 上面的命令是最小化组建安装amp也就是apache2 ,php5 和 mysql 在...

How to Install and Use Cockpit on CentOS 8 / RHEL 8
How to Install and Use Cockpit on CentOS 8 / RHEL 8 by Pradeep Kumar · Published September 29, 2019 · Updated October 6, 2019 Cockpit is a Web based server ...
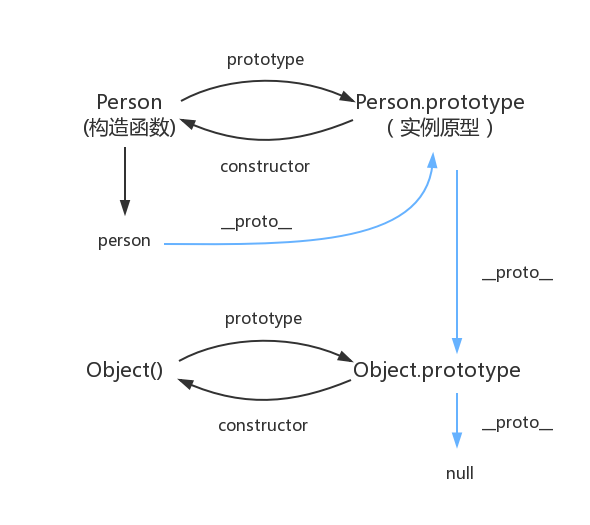
原型对象,原型链
函数都有prototype属性,它指向原型对象。 实例对象有__proto__属性,它指向对象原型 每一个原型对象都有constructor输赢,指向构造函数,每一个原型对象又具有__proto__属性,这个指向Object.prototype.在这里插入图片描述...
猜你喜欢

Node 调用 dubbo 服务的探索及实践
2.Dubbo简介 2.1 什么是dubbo Dubbo是一款高性能、轻量级的开源Java RPC框架,它提供了三大核心能力:面向接口的远程方法调用,智能容错和负载均衡,以及服务自动注册和发现。 2.2 流程图 Provider : 暴露服务的服务提供方。 Consumer : 调用远程服务的服务消费方。 Registry : 服务注册与发现的注册中心。 Monito...

mysql总结
mysql基础入门的总结 关于数据库: 数据库是软件开发人员要掌握的基本工具,软件的运行的过程就是操作数据的过程,数据库中的数据无非就是几个操作:增-删-查-改。 Mysql安装完成后,需要配置变量环境,找到配置路径path,然后把mysql安装目录bin文件导入就可以了。 然后运行cm...
adb及monkey常用命令
adb常用命令: 查看手机是否连接:adb devices 连接设备:adb connect 设备ip:端口号 若有连接多个设备需指明设备ip及端口号 安装APP:adb install [-r] 包名 -r表示覆盖安装,首次安装可省略 卸载APP:adb uninstall 包名 列出设备中所有应用包名:adb shell pm list packages ...
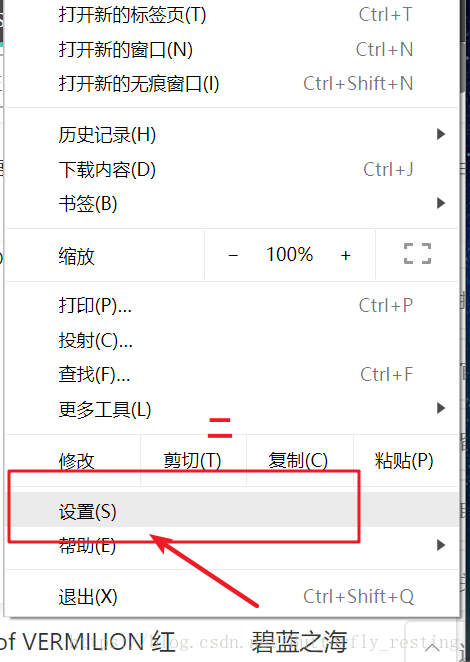
PC端浏览器如何设置无图模式
以谷歌浏览器为例,注意有些浏览器并不支持该功能。 1)打开自定义与控制 2)选择设置 3)查看左边状态栏,选择高级设置--》隐私设置和安全性 4)选择内容设置 5)图片 6)选择不显示任何图片,其中也可以只禁用某些网站图片,或者只开启自己想显示图片的网站...
2021-06-08
IDEA中使用springMVC 出现 404请求的资源不可用的其他一个可能原因 如果你确认你在视图解析器中的路径设置没有问题,各种文件名都没问题,却依然出现资源不可用错误 你可以检查这个页面中是否为web部署了工件,没有的话部署一下就好了。...
问答精选
Correctly formatting GCM notifications?
I'm currently trying out the google cloud messaging service with its sample application "Guestbook." https://developers.google.com/cloud/samples/mbs/ I'm attempting to send notifications tha...
Are there any performance benefits of using Asynchronous functions over Synchronous in Node Js?
Now I came across an article that distinguishes between an Asynchronous function and Synchronous functions. From my understanding of the different examples and explanations, synchronous functions are ...
Python: Costing calculator output
Good day all I'm busy creating a small costing calculator for the signage department. I'm not getting the calculator to output the amount. Brief Description: You enter the height and width and then wh...
Flask-SQLAlchemy - model has no attribute 'foreign_keys'
I have 3 models created with Flask-SQLalchemy: User, Role, UserRole role.py: user.py: user_role.py: If I try (in the console) to get all users via User.query.all() I get AttributeError: 'NoneType' obj...
Seeding many PRNGs, then having to seed them again, what is a good quality approach?
I have many particles that follow an stochastic process in parallel. For each particle, there is a PRNG associated to it. The simulation must go through many repetitions to get average results. For ea...
相关问题
- How to Install DBMonitor
- How to create the index on MUL key in Mysql?
- How to debug on Opera Mini?
- How To Create A Gallery on iOS
- How to set default height on QTableWidget
- How to "Skin" an application on Mac?
- Visual Studio 2008: How to install an item template
- How to install MySQLdb package? (ImportError: No module named setuptools)
- What are sqlite development headers and how to install them?
- Couchdb 2.0.0 Make Install失败在CentOS 7上
相关文章
- How To Install and Use Docker Compose on CentOS 7
- How to Install Elastic Stack on CentOS 7
- 【Cockpit 】How to install Cockpit on CentOS 7/8?
- How To Install MongoDB on CentOS 6
- [转载] How to Install a Kubernetes Docker Cluster on CentOS 7
- 转:How to Install Redmine 3 with Nginx on CentOS 7
- How To Install Zabbix Server 3.0 on CentOS/RHEL 7/6/5
- How to install Apache, PHP 7.2 and MySQL on CentOS 7.4 (LAMP)
- How to install and config MySQL on Ubuntu Linux
- 【MySQL&SSL】How To Configure SSL/TLS for MySQL on CentOS7.x?
热门文章
推荐文章
相关标签
推荐问答
- ShareActionProvider with background processing
- gridview changing position automatically when notifiedDatasetChangedCalled?
- How to efficiently fill-in a structure with vectors?
- when i exit from node js, i just cant give command in my terminal
- How to upload an image with Spray?
- Edit my message before posting in Twitter with Twitter API and PHP
- Using css style selector in JQuery not working?
- Can Html.Display/Html.DisplayFor/Html.DisplayForModel work with a DataTable?
- What does <?!= mean in Google Apps Script?
- Python/Linux - Manually installing httplib2 as a non-root user