转:How to Install Redmine 3 with Nginx on CentOS 7
不喜欢一键式安装redmine,于是下功夫看了很多文档于博客,最后发现互相抄袭严重,最后找到此文。此文算是逻辑清晰、步骤明确的指导手册,但文中缺少一些更加详细的内容,所有,如果要看懂,还是需要有一些linux系统、Ruby、Nginx、的知识。亲测,成功在centos7.6上安装redmine3.3.9(selinux和firewall均为关闭状态)。
On this page
- Step 1 - Install the Redmine dependencies
- Step 2 - Install Ruby and RVM
- Step 3 - Configure the Database for Redmine
- Step 4 - Install Phusion Passenger and Nginx
- Step 5 - Configure Nginx
- Step 6 - Install Redmine
- Conclusion
Redmine is an open source web application for project management and issue tracker. Redmine is based on the Ruby on Rails Framework, it has cross-platform and cross-database support and ships with translations for 42 languages. The software allows you to track multiple projects, it integrates news, document and file management and a support wiki per-project. User accounts can be authenticated against an LDAP directory and third party software can be connected trough a REST API.
In this tutorial, we will install Redmine 3.2 with Nginx as the web server, MySQL as the database server on a CentOS 7 (64 bit) operating system.
Prerequisite
- CentOS 7 - 64 bit.
- Root privileges.
Step 1 - Install the Redmine dependencies
Redmine has a lot of dependencies that we will install first. Login to your CentOS 7 server as root user:
ssh [email protected]Install all dependencies that are required by Redmine and the packages needed for ruby and rvm with the yum command below:
yum install zlib-devel curl-devel openssl-devel httpd-devel apr-devel apr-util-devel mysql-devel ftp wget ImageMagick-devel gcc-c++ patch readline readline-devel zlib libyaml-devel libffi-devel make bzip2 autoconf automake libtool bison iconv-devel subversionThe installation will ask for a MySQL password. Type in your new MySQL root password when requested.
Step 2 - Install Ruby and RVM
In this step, we will install rvm (latest version) and ruby 2.2. Redmine 3.2 supports ruby version 2.2. RVM (Ruby Version Manager) is a command line tool that allows you to install, manage and work with multiple ruby environments on the same server.
gpg2 --keyserver hkp://keys.gnupg.net --recv-keys 409B6B1796C275462A1703113804BB82D39DC0E3
curl -L https://get.rvm.io | bash -s stable --ruby=2.2.5
When the installation finished, we have to reload RVM and add it to the .bashrc file for automatic reloading:
source /usr/local/rvm/scripts/rvm
echo '[[ -s "/usr/local/rvm/scripts/rvm" ]] && source "/usr/local/rvm/scripts/rvm"' >> ~/.bashrc
Reload the .bashrc file and check the Ruby and RVM version.
source ~/.bashrc
ruby -v
rvm -v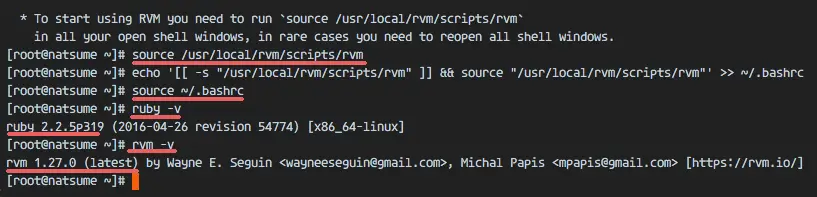
Step 3 - Configure the Database for Redmine
In this step, we will install the mysql-server package from the official MySQL repository.
Add the Oracle MySQL repository and check the repository list.
rpm -Uvh https://dev.mysql.com/get/mysql57-community-release-el7-9.noarch.rpm
yum repolist
to ensure that the MySQL server repositry has been added successfully.
Install the MySQL server with this yum command.
yum install mysql-serverWhen the installation finished, start the mysqld service and configure the MySQL root password.
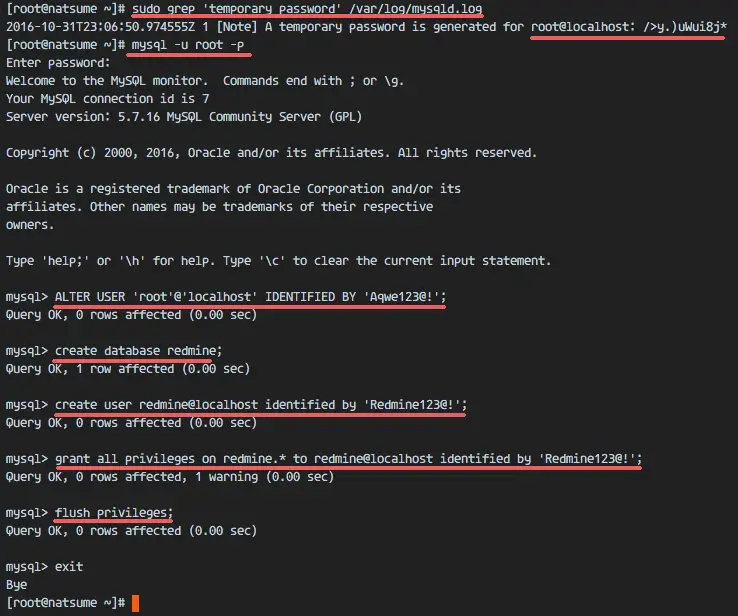
systemctl start mysqldMysql server has been started. Now get the temporay root password for the mysql server with the grep command below:
grep 'temporary password' /var/log/mysqld.logYou will see a result similar to this:
2016-10-31T23:06:50.974555Z 1 [Note] A temporary password is generated for root@localhost: />y.)uWui8j*So we know the root password for the MySQL server is: />y.)uWui8j*
Now we will set a new root password for mysql server. Log in to the mysql shell with user root and the generated password:
mysql -u root -p
GENERATED PASSWORD: />y.)uWui8j*
Set a new root user password with the mysql query below:
ALTER USER 'root'@'localhost' IDENTIFIED BY 'Aqwe123@!';Next, create a new database called "redmine" and create a new user 'redmine' with password 'redmine' (use a secure password on your server here!). Then grant all privilages for the user to the 'redmine' database.
create database redmine;
create user redmine@localhost identified by 'Redmine123@!';
grant all privileges on redmine.* to redmine@localhost identified by 'Redmine123@!';
flush privileges;
exit
Database and user have been created.
Step 4 - Install Phusion Passenger and Nginx
Phusion Passenger is web application server that can be used together with apache and nginx. It supports multiple languages: Ruby, Python and Nodejs. It is easy to us, fast, can handle more traffic and provides security enhancements.
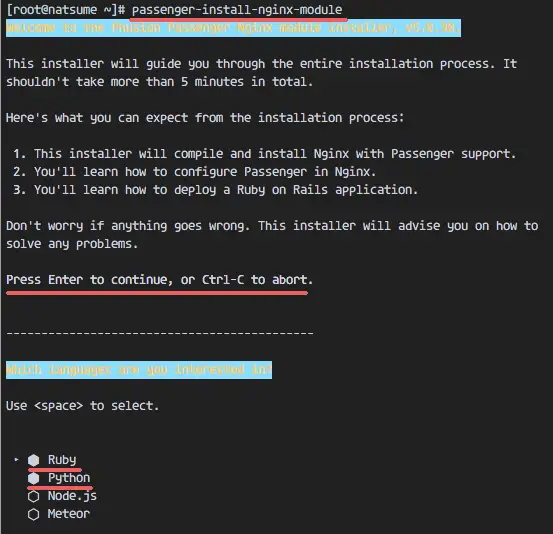
In this chapter, we will install the Phusion Passenger and integrate it with our nginx web server. Install passenger with the gem command below, then run the command passenger-nginx-module.
gem install passenger --no-ri --no-rdoc
passenger-install-nginx-module
The command will ask you which programming language shall be used, select Ruby and Python.
You will be asked about the nginx installation; select "Yes: download, compile and install Nginx for me. (recommended)".
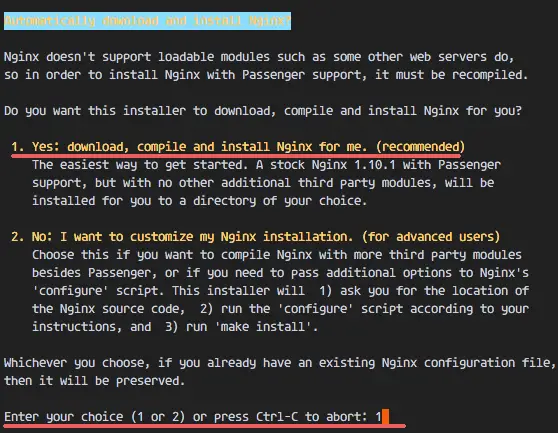
You will be asked for the nginx installation directory, use the default '/opt/nginx/', just press "Enter".
Step 5 - Configure Nginx
When the nginx installation is done, go to the installation directory and edit the nginx.conf file with an editor.
cd /opt/nginx/
cd conf/
vim nginx.conf
Paste the configuration below at line 24:
include vhost/*.conf;Save the file and exit the editor.
Create a new 'vhost' directory for the virtual host configuration.
mkdir -p /opt/nginx/conf/vhost
Go to the vhost directory and create the redmine virtualhost configuration with vim:
cd /opt/nginx/conf/vhost/
vim redmine.conf
Paste the virtual host configuration below:
    server {
        listen       80;
        server_name  www.redmine.me;

        root /var/www/redmine/public;
        passenger_enabled on;
        client_max_body_size      10m; # Max attachemnt size

        # redirect server error pages to the static page /50x.html
        #
        error_page   500 502 503 504  /50x.html;
        location = /50x.html {
            root   html;
        }
    }
Save the file.
Ubuntu 16.04 uses systemd as init system. Next we configure nginx for systemd. Go to the systemd directory and create new service file named 'nginx.service'.
cd /lib/systemd/system/
vim nginx.service
Paste nginx script for systemd below :
[Unit]
Description=The NGINX HTTP and reverse proxy server
After=syslog.target network.target remote-fs.target nss-lookup.target

[Service]
Type=forking
PIDFile=/opt/nginx/logs/nginx.pid
ExecStartPre=/opt/nginx/sbin/nginx -t
ExecStart=/opt/nginx/sbin/nginx
ExecReload=/bin/kill -s HUP $MAINPID
ExecStop=/bin/kill -s QUIT $MAINPID
PrivateTmp=true

[Install]
WantedBy=multi-user.target
Save and exit.
Reload the systemd service and try to start nginx with systemctl command:
systemctl daemon-reload
systemctl start nginx
If you want to check nginx, check the open port 80:
netstat -plntu | grep nginxThe result should be like this:
tcp 0 0 0.0.0.0:80 0.0.0.0:* LISTEN 4871/nginx
Step 6 - Install Redmine
Make a new directory for the Redmine installation. I will use the '/var/www/' directory here.
mkdir -p /var/www/Go to '/var/www/' directory and download Redmine with the svn command:
cd /var/www/
svn co https://svn.redmine.org/redmine/branches/3.2-stable redmine
Go to the Redmine directory and copy the configuration file and database configuration file:
cd redmine
cp config/configuration.yml.example config/configuration.yml
cp config/database.yml.example config/database.yml
Edit the database.yml file with vim:
vim config/database.ymlIn the production section line, fill in the database name user and password:
production:
  adapter: mysql2
  database: redmine
  host: localhost
  username: redmine
  password: "Redmine123@!"
  encoding: utf8
Save the file.
In the redmine directory, create some new directories and change the owner to user and group nobody:
mkdir -p tmp tmp/pdf public/plugin_assets
sudo chown -R nobody:nobody files log tmp public/plugin_assets
sudo chmod -R 775 files log tmp public/plugin_assets
Install the bundler and gem dependencies for redmine:
gem install bundler
bundle install --without development test
Generate the secret token, then generate the database:
bundle exec rake generate_secret_token
RAILS_ENV=production bundle exec rake db:migrate
RAILS_ENV=production bundle exec rake redmine:load_default_data
Restart nginx and visit the redmine domain name with a web browser:
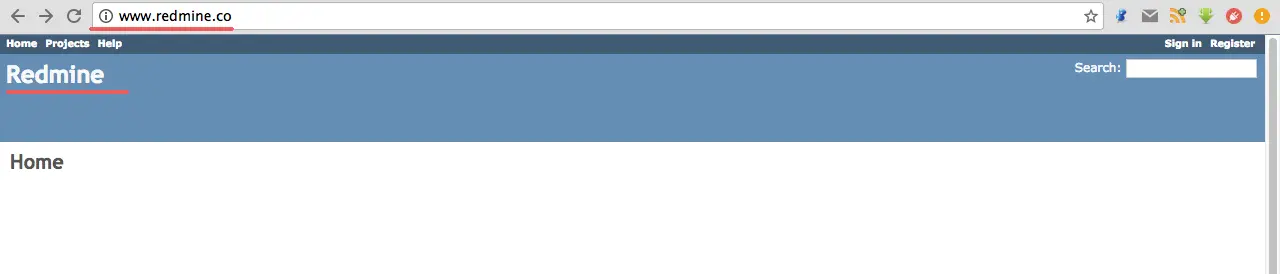
systemctl restart nginxVisit redmine installation, mine is: www.redmine.co
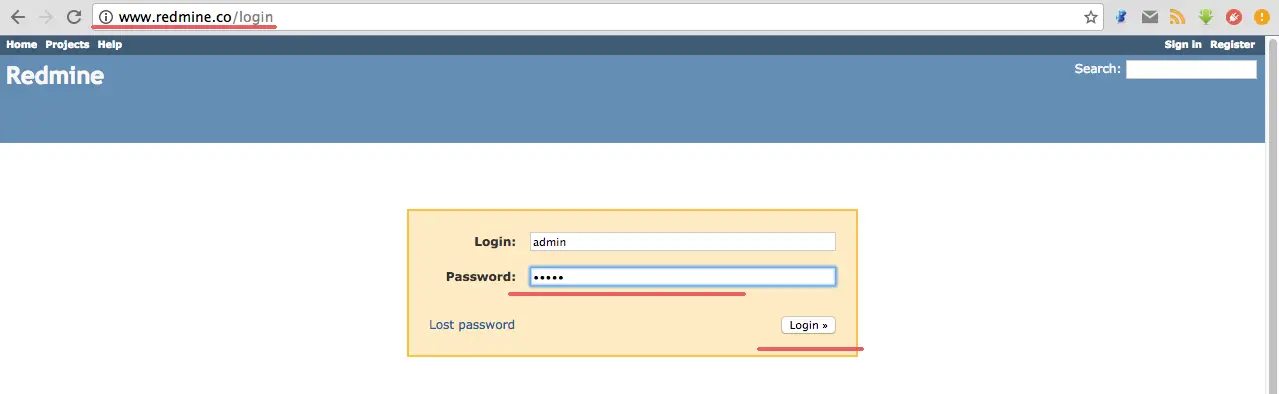
Login to the admin page: www.redmine.co/login
The default user and password is 'admin'.
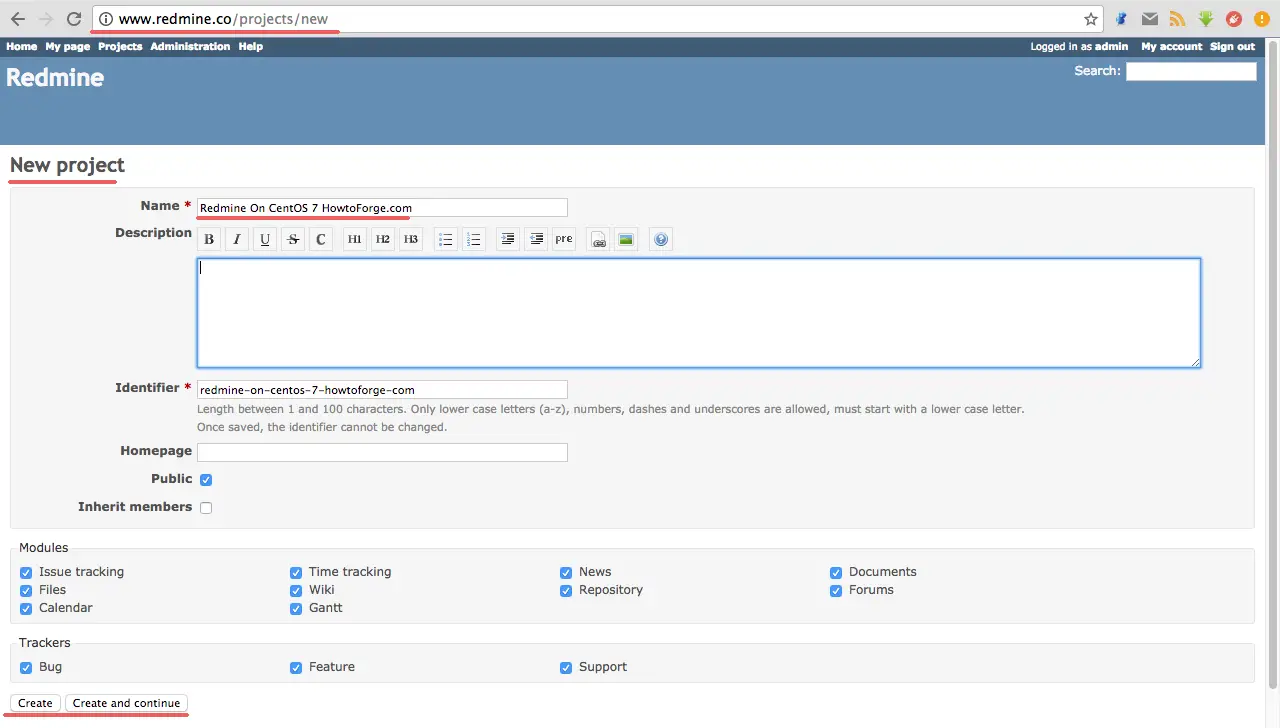
Create a new sample project.
Sample Project Page.
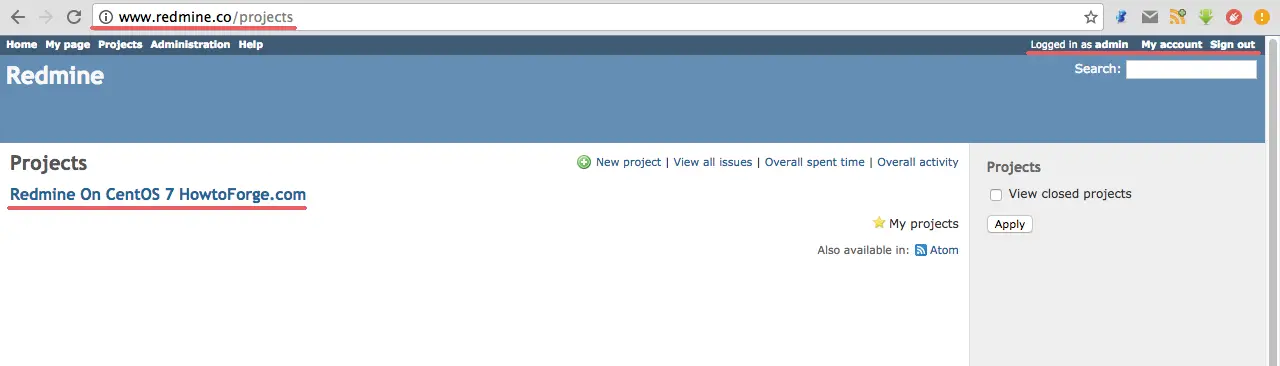
Installation of Redmine with Nginx and MySQL on CentOS 7 has been successful.
Conclusion
Redmine is a web-based application for project management and issue tracking. Redmine is cross-platform, so we can run it on Windows, Linux or Mac OS. Redmine has support for many databases like MySQL, PostgreSQL, Microsoft SQL Server and SQLite. Redmine is easy to install and configure, we can use Apache or Nginx as the web server. Redmine is very powerful and has many features like multi-language support, file management, wiki and a REST API. Redmine is one of the best free solutions if you want to build your own project management with issue tracking.
原文:https://www.howtoforge.com/tutorial/how-to-install-redmine-3-with-nginx-on-centos-7/
来源:网络
智能推荐


How to install php evn on ubuntu
1. How to install PHP EVN 打开终端,也就是命令提示符。 我们先来最小化组建安装,按照自己的需求一步一步装其他扩展。命令提示符输入如下命令: 1 sudo apt-get install apache2 php5-mysql libapache2-mod-php5 mysql-server 上面的命令是最小化组建安装amp也就是apache2 ,php5 和 mysql 在...

How to Install and Use Cockpit on CentOS 8 / RHEL 8
How to Install and Use Cockpit on CentOS 8 / RHEL 8 by Pradeep Kumar · Published September 29, 2019 · Updated October 6, 2019 Cockpit is a Web based server ...
How to install Apache, PHP 7.2 and MySQL on CentOS 7.4 (LAMP)
How to install Apache, PHP 7.2 and MySQL on CentOS 7.4 (LAMP) This tutorial exists for these OS versions CentOS 7.4 CentOS 7.3 CentOS 7 CentOS 6.5 CentOS 6.2 CentOS 6.1 On this page 1 Preliminary Note...
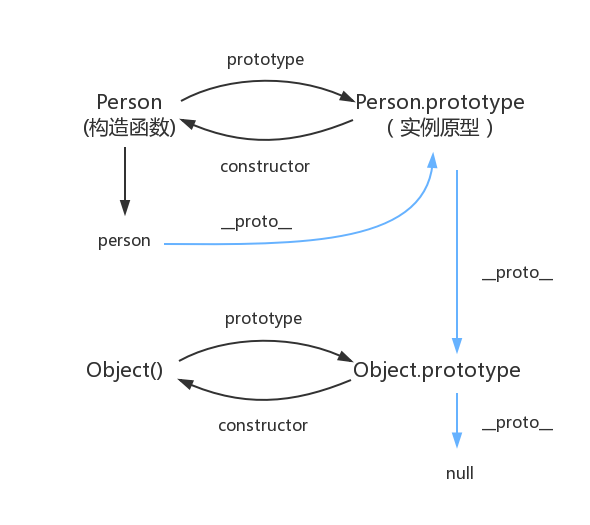
原型对象,原型链
函数都有prototype属性,它指向原型对象。 实例对象有__proto__属性,它指向对象原型 每一个原型对象都有constructor输赢,指向构造函数,每一个原型对象又具有__proto__属性,这个指向Object.prototype.在这里插入图片描述...
猜你喜欢

Node 调用 dubbo 服务的探索及实践
2.Dubbo简介 2.1 什么是dubbo Dubbo是一款高性能、轻量级的开源Java RPC框架,它提供了三大核心能力:面向接口的远程方法调用,智能容错和负载均衡,以及服务自动注册和发现。 2.2 流程图 Provider : 暴露服务的服务提供方。 Consumer : 调用远程服务的服务消费方。 Registry : 服务注册与发现的注册中心。 Monito...

mysql总结
mysql基础入门的总结 关于数据库: 数据库是软件开发人员要掌握的基本工具,软件的运行的过程就是操作数据的过程,数据库中的数据无非就是几个操作:增-删-查-改。 Mysql安装完成后,需要配置变量环境,找到配置路径path,然后把mysql安装目录bin文件导入就可以了。 然后运行cm...
adb及monkey常用命令
adb常用命令: 查看手机是否连接:adb devices 连接设备:adb connect 设备ip:端口号 若有连接多个设备需指明设备ip及端口号 安装APP:adb install [-r] 包名 -r表示覆盖安装,首次安装可省略 卸载APP:adb uninstall 包名 列出设备中所有应用包名:adb shell pm list packages ...
PC端浏览器如何设置无图模式
以谷歌浏览器为例,注意有些浏览器并不支持该功能。 1)打开自定义与控制 2)选择设置 3)查看左边状态栏,选择高级设置--》隐私设置和安全性 4)选择内容设置 5)图片 6)选择不显示任何图片,其中也可以只禁用某些网站图片,或者只开启自己想显示图片的网站...
2021-06-08
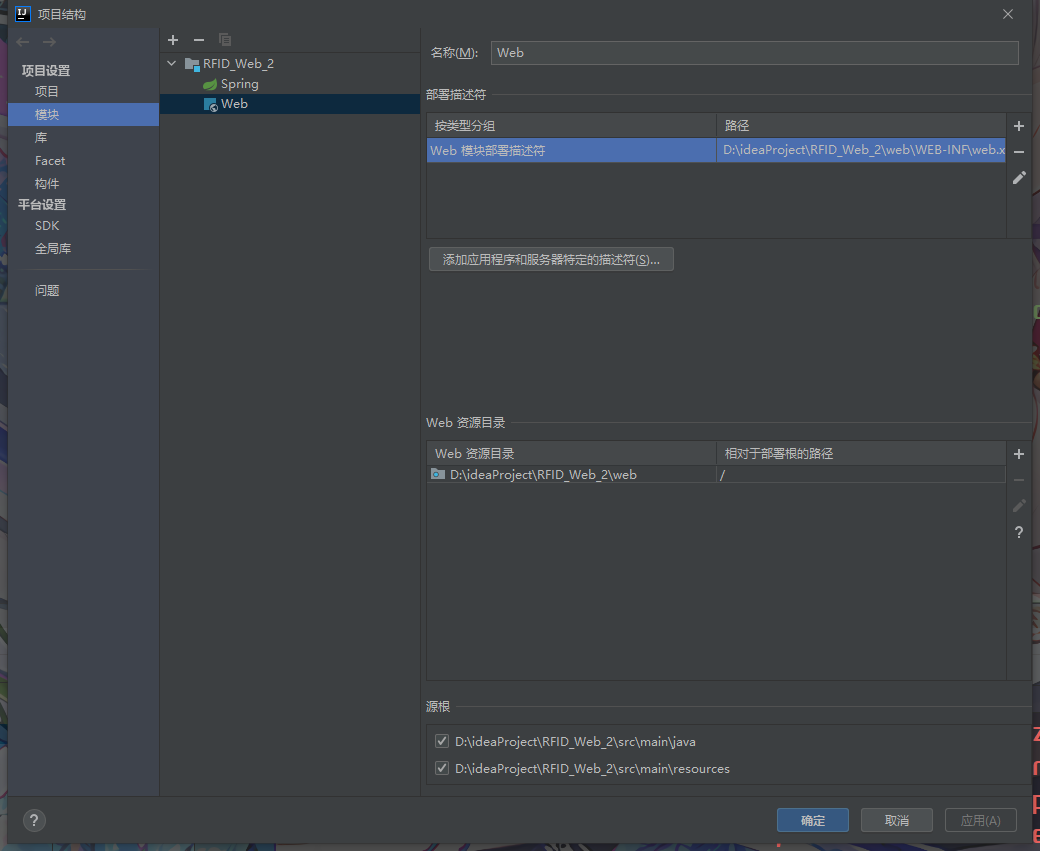
IDEA中使用springMVC 出现 404请求的资源不可用的其他一个可能原因 如果你确认你在视图解析器中的路径设置没有问题,各种文件名都没问题,却依然出现资源不可用错误 你可以检查这个页面中是否为web部署了工件,没有的话部署一下就好了。...
问答精选
Correctly formatting GCM notifications?
I'm currently trying out the google cloud messaging service with its sample application "Guestbook." https://developers.google.com/cloud/samples/mbs/ I'm attempting to send notifications tha...
Are there any performance benefits of using Asynchronous functions over Synchronous in Node Js?
Now I came across an article that distinguishes between an Asynchronous function and Synchronous functions. From my understanding of the different examples and explanations, synchronous functions are ...
Python: Costing calculator output
Good day all I'm busy creating a small costing calculator for the signage department. I'm not getting the calculator to output the amount. Brief Description: You enter the height and width and then wh...
Flask-SQLAlchemy - model has no attribute 'foreign_keys'
I have 3 models created with Flask-SQLalchemy: User, Role, UserRole role.py: user.py: user_role.py: If I try (in the console) to get all users via User.query.all() I get AttributeError: 'NoneType' obj...
Seeding many PRNGs, then having to seed them again, what is a good quality approach?
I have many particles that follow an stochastic process in parallel. For each particle, there is a PRNG associated to it. The simulation must go through many repetitions to get average results. For ea...
相关问题
- how to change views with clearcase on eclipse
- How to Install DBMonitor
- How to install MySQLdb (Python data access library to MySQL) on Mac OS X?
- NGINX CENTOS7禁止
- Need help with logic on how to assign the correct value to a textbox
- how to control popup with ruby on rails, mouse roll-over
- How to use virtualenv with Google App Engine SDK on Mac OS X 10.6
- Couchdb 2.0.0 Make Install失败在CentOS 7上
- How to get Custom Error Pages working for Classic ASP with IIS 7 Integrated Pipeline
- Want to display a 3D model on the iPhone: how to get started?
相关文章
- How To Install MySQL on CentOS 7
- How To Install and Use Docker Compose on CentOS 7
- How to Install Elastic Stack on CentOS 7
- 【Cockpit 】How to install Cockpit on CentOS 7/8?
- How To Install MongoDB on CentOS 6
- [转载] How to Install a Kubernetes Docker Cluster on CentOS 7
- How To Install Zabbix Server 3.0 on CentOS/RHEL 7/6/5
- how to install subversion(svn) with eclipse on windows
- Linux: How to Restart Nginx on Ubuntu/Centos/Docker
- How to install Nvidia drivers in CentOS 7 - Tutorial
热门文章
推荐文章
相关标签
推荐问答
- ShareActionProvider with background processing
- gridview changing position automatically when notifiedDatasetChangedCalled?
- How to efficiently fill-in a structure with vectors?
- when i exit from node js, i just cant give command in my terminal
- How to upload an image with Spray?
- Edit my message before posting in Twitter with Twitter API and PHP
- Using css style selector in JQuery not working?
- Can Html.Display/Html.DisplayFor/Html.DisplayForModel work with a DataTable?
- What does <?!= mean in Google Apps Script?
- Python/Linux - Manually installing httplib2 as a non-root user