自定义控件之绘图篇(一):概述及基本几何图形绘制
一、Paint与Canvas
像我们平时画图一样,需要两个工具,纸和笔。Paint就是相当于笔,而Canvas就是纸,这里叫画布。
所以,凡有跟要要画的东西的设置相关的,比如大小,粗细,画笔颜色,透明度,字体的样式等等,都是在Paint里设置;同样,凡是要画出成品的东西,比如圆形,矩形,文字等相关的都是在Canvas里生成。
下面先说下Paint的基本设置函数:
paint.setAntiAlias(true);//抗锯齿功能
paint.setColor(Color.RED); //设置画笔颜色
paint.setStyle(Style.FILL);//设置填充样式
paint.setStrokeWidth(30);//设置画笔宽度
paint.setShadowLayer(10, 15, 15, Color.GREEN);//设置阴影
前两个没什么好说的,看填充样式的区别:
1、void setStyle (Paint.Style style) 设置填充样式
Paint.Style.FILL :填充内部
Paint.Style.FILL_AND_STROKE :填充内部和描边
Paint.Style.STROKE :仅描边
看下这三个类型的不同,下面以画的一个圆形为例:
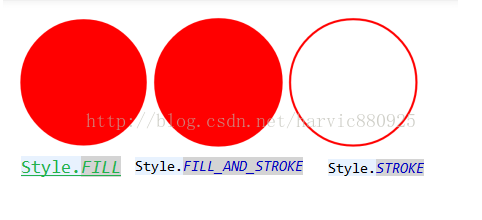
可见,FILL与FILL_AND_STROKE没什么区别。
2、setShadowLayer (float radius, float dx, float dy, int color) 添加阴影
参数:
radius:阴影的倾斜度
dx:水平位移
dy:垂直位移
使用代码:
paint.setShadowLayer(10, 15, 15, Color.GREEN);//设置阴影
然后是Canvas的基本设置:

画布背景设置:
canvas.drawColor(Color.BLUE);
canvas.drawRGB(255, 255, 0); //这两个功能一样,都是用来设置背景颜色的。
二、实例操作
先给大家讲下怎么在写画图程序,大家可以边看边写边看效果是怎样的,先利用一个画直线的函数来测试一下吧,划直线当然是canvas.drawline();上面说了,有关画笔设置的都是Paint,有关画图的都在Canvas类中;
1、首先新建一个工程,把默认的XML改成FrameLayout布局,布局代码如下:
<FrameLayout xmlns:android="http://schemas.android.com/apk/res/android"
xmlns:tools="http://schemas.android.com/tools"
android:id="@+id/root"
android:layout_width="match_parent"
android:layout_height="match_parent"
tools:context="com.example.try_paint_blog.MainActivity" >
</FrameLayout>
这里有个特别要注意的地方,给根结点FrameLayout加一个ID号,后面用来在它的内部添加视图用的
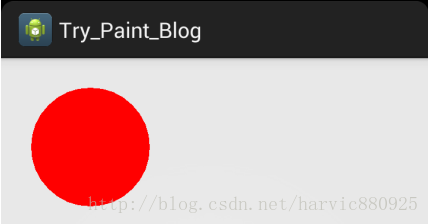
2、然后新建一个视图类,派生自View,为什么要新建视图类呢,因为我们要自由的显示东西,当然要重写视图类了,在OnDraw()函数中返回什么,这个视图就会长什么样。话不多说,新建一个派生自View的类MyView,然后重写OnDraw()函数:
public class MyView extends View {
Context m_context;
public MyView(Context context) {
super(context);
// TODO Auto-generated constructor stub
m_context=context;
}
//重写OnDraw()函数,在每次重绘时自主实现绘图
@Override
protected void onDraw(Canvas canvas) {
// TODO Auto-generated method stub
super.onDraw(canvas);
//设置画笔基本属性
Paint paint=new Paint();
paint.setAntiAlias(true);//抗锯齿功能
paint.setColor(Color.RED); //设置画笔颜色
paint.setStyle(Style.FILL);//设置填充样式 Style.FILL/Style.FILL_AND_STROKE/Style.STROKE
paint.setStrokeWidth(5);//设置画笔宽度
paint.setShadowLayer(10, 15, 15, Color.GREEN);//设置阴影
//设置画布背景颜色
canvas.drawRGB(255, 255,255);
//画圆
canvas.drawCircle(190, 200, 150, paint);
}
}
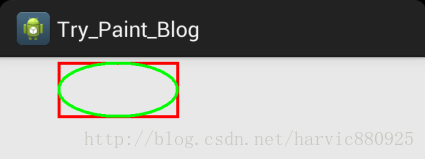
在这段代码中,首先对画笔进行基本的样式设置,(对几何图形设置阴影,好像没作用),然后利用DrawCircle()画了一个圆。关于这个函数,下面会再讲,大家只知道用来画圆就好了。
3、视图类写好了,下面就要将其加入到Activity中,让它显示出来,在MainActiviy中添加如下代码:
public class MainActivity extends Activity {
@Override
protected void onCreate(Bundle savedInstanceState) {
super.onCreate(savedInstanceState);
setContentView(R.layout.activity_main);
FrameLayout root=(FrameLayout)findViewById(R.id.root);
root.addView(new MyView(MainActivity.this));
}
}
首先找到FrameLayout结点,然后把新生成的MyView实例加入到其中。
运行之后,效果如下:
源码下载地址:http://download.csdn.net/detail/harvic880925/7834517

三、基本几何图形绘制
1、画直线
void drawLine (float startX, float startY, float stopX, float stopY, Paint paint)
参数:
startX:开始点X坐标
startY:开始点Y坐标
stopX:结束点X坐标
stopY:结束点Y坐标
Paint paint=new Paint();
paint.setColor(Color.RED); //设置画笔颜色
paint.setStyle(Style.FILL);//设置填充样式
paint.setStrokeWidth(5);//设置画笔宽度
canvas.drawLine(100, 100, 200, 200, paint);
2、多条直线

void drawLines (float[] pts, Paint paint)
void drawLines (float[] pts, int offset, int count, Paint paint)
参数:
pts:是点的集合,大家下面可以看到,这里不是形成连接线,而是每两个点形成一条直线,pts的组织方式为{x1,y1,x2,y2,x3,y3,……}
Paint paint=new Paint();
paint.setColor(Color.RED); //设置画笔颜色
paint.setStyle(Style.FILL);//设置填充样式
paint.setStrokeWidth(5);//设置画笔宽度
float []pts={10,10,100,100,200,200,400,400};
canvas.drawLines(pts, paint);
(上面有四个点:(10,10)、(100,100),(200,200),(400,400)),两两连成一条直线;
3、点
void drawPoint (float x, float y, Paint paint)
参数:
float X:点的X坐标
float Y:点的Y坐标
Paint paint=new Paint();
paint.setColor(Color.RED); //设置画笔颜色
paint.setStyle(Style.FILL);//设置填充样式
paint.setStrokeWidth(15);//设置画笔宽度
canvas.drawPoint(100, 100, paint);
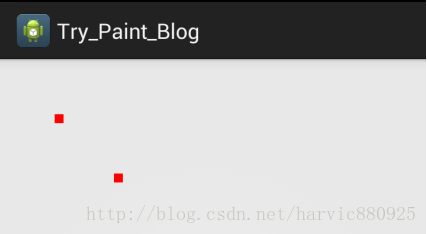
4、多个点

void drawPoints (float[] pts, Paint paint)
void drawPoints (float[] pts, int offset, int count, Paint paint)
参数:
float[] pts:点的合集,与上面直线一直,样式为{x1,y1,x2,y2,x3,y3,……}
int offset:集合中跳过的数值个数,注意不是点的个数!一个点是两个数值;
count:参与绘制的数值的个数,指pts[]里人数值个数,而不是点的个数,因为一个点是两个数值
下面举例说明上面offset与count的含义:(跳过第一个点,画出后面两个点,第四个点不画),注意一个点是两个数值!
Paint paint=new Paint();
paint.setColor(Color.RED); //设置画笔颜色
paint.setStyle(Style.FILL);//设置填充样式
paint.setStrokeWidth(15);//设置画笔宽度
float []pts={10,10,100,100,200,200,400,400};
canvas.drawPoints(pts, 2, 4, paint);
(同样是上面的四个点:(10,10)、(100,100),(200,200),(400,400),drawPoints里路过前两个数值,即第一个点横纵坐标,画出后面四个数值代表的点,即第二,第三个点,第四个点没画;效果图如下)
5、矩形工具类RectF与Rect
这两个都是矩形辅助类,区别不大,用哪个都行,根据四个点构建一个矩形结构;在画图时,利用这个矩形结构可以画出对应的矩形或者与其它图形Region相交、相加等等;
RectF:
构造函数有下面四个,但最常用的还是第二个,根据四个点构造出一个矩形;
RectF()
RectF(float left, float top, float right, float bottom)
RectF(RectF r)
RectF(Rect r)
Rect
构造函数如下,最常用的也是根据四个点来构造矩形
Rect()
Rect(int left, int top, int right, int bottom)
Rect(Rect r)
6、矩形
void drawRect (float left, float top, float right, float bottom, Paint paint)
void drawRect (RectF rect, Paint paint)
void drawRect (Rect r, Paint paint)
参数:
第一个的写法是直接传入矩形的四个点,画出矩形
第二、三个构造函数是根据传入RectF或者Rect矩形变量来指定所画的矩形的
Paint paint=new Paint();
paint.setColor(Color.RED); //设置画笔颜色
paint.setStyle(Style.FILL);//设置填充样式
paint.setStrokeWidth(15);//设置画笔宽度
canvas.drawRect(10, 10, 100, 100, paint);//直接构造
RectF rect = new RectF(120, 10, 210, 100);
canvas.drawRect(rect, paint);//使用RectF构造
Rect rect2 = new Rect(230, 10, 320, 100);
canvas.drawRect(rect2, paint);//使用Rect构造
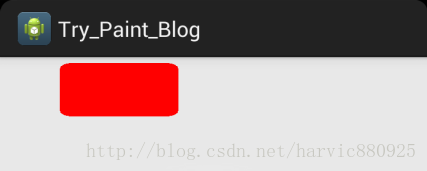
7、圆角矩形

void drawRoundRect (RectF rect, float rx, float ry, Paint paint)
参数:
RectF rect:要画的矩形
float rx:生成圆角的椭圆的X轴半径
float ry:生成圆角的椭圆的Y轴半径
Paint paint=new Paint();
paint.setColor(Color.RED); //设置画笔颜色
paint.setStyle(Style.FILL);//设置填充样式
paint.setStrokeWidth(15);//设置画笔宽度
RectF rect = new RectF(100, 10, 300, 100);
canvas.drawRoundRect(rect, 20, 10, paint);
8、圆形
void drawCircle (float cx, float cy, float radius, Paint paint)
参数:
float cx:圆心点X轴坐标
float cy:圆心点Y轴坐标
float radius:圆的半径
Paint paint=new Paint();
paint.setColor(Color.RED); //设置画笔颜色
paint.setStyle(Style.FILL);//设置填充样式
paint.setStrokeWidth(15);//设置画笔宽度
canvas.drawCircle(150, 150, 100, paint);
9、椭圆
椭圆是根据矩形生成的,以矩形的长为椭圆的X轴,矩形的宽为椭圆的Y轴,建立的椭圆图形
void drawOval (RectF oval, Paint paint)
参数:
RectF oval:用来生成椭圆的矩形
Paint paint=new Paint();
paint.setColor(Color.RED); //设置画笔颜色
paint.setStyle(Style.STROKE);//填充样式改为描边
paint.setStrokeWidth(5);//设置画笔宽度
RectF rect = new RectF(100, 10, 300, 100);
canvas.drawRect(rect, paint);//画矩形
paint.setColor(Color.GREEN);//更改画笔颜色
canvas.drawOval(rect, paint);//同一个矩形画椭圆
10、弧
弧是椭圆的一部分,而椭圆是根据矩形来生成的,所以弧当然也是根据矩形来生成的;
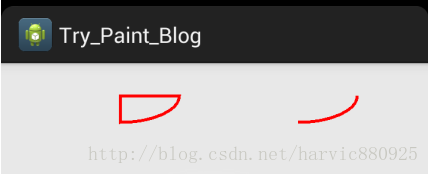
void drawArc (RectF oval, float startAngle, float sweepAngle, boolean useCenter, Paint paint)
参数:
RectF oval:生成椭圆的矩形
float startAngle:弧开始的角度,以X轴正方向为0度
float sweepAngle:弧持续的角度
boolean useCenter:是否有弧的两边,True,还两边,False,只有一条弧
(1)将画笔设为描边,效果:
Paint paint=new Paint();
paint.setColor(Color.RED); //设置画笔颜色
paint.setStyle(Style.STROKE);//填充样式改为描边
paint.setStrokeWidth(5);//设置画笔宽度
RectF rect1 = new RectF(100, 10, 300, 100);
canvas.drawArc(rect1, 0, 90, true, paint);
RectF rect2 = new RectF(400, 10, 600, 100);
canvas.drawArc(rect2, 0, 90, false, paint);
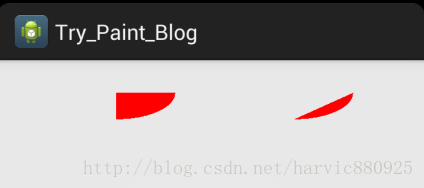
(二)、将画笔设为填充
Paint paint=new Paint();
paint.setColor(Color.RED); //设置画笔颜色
paint.setStyle(Style.FILL);//填充样式改为描边
paint.setStrokeWidth(5);//设置画笔宽度
RectF rect1 = new RectF(100, 10, 300, 100);
canvas.drawArc(rect1, 0, 90, true, paint);
RectF rect2 = new RectF(400, 10, 600, 100);
canvas.drawArc(rect2, 0, 90, false, paint);
来源:网络
智能推荐
android--------自定义控件 之 基本流程篇
在我们平常的Android开发中经常和控件打交道,有时Android提供的控件未必能满足业务的需求,这个时候就需要我们实现自定义一些控件 自定义控件可以设计出很多你想要的功能和模块,在开发中是很重要的一部分。 自定义View的价值 能够做到基础控件无法做到的效果,为应用的表现增色; 在多个应用并行开发的团队,将公用的交互效果提取成自定义控件,方便复用,减少不必要的重复劳动; 将控件的...

ggplot2——绘制基本几何图形
参考书目 ggplot2:数据分析与图形艺术 #ggplot 绘图 #要使用ggplot2,必须先安装他,安装R之后可以用如下命令来下载和安装ggplot2软件包 install.packages(“ggplot2”) #加载安装包 library(ggplot2) #1 使用数据为ggplot2内置的mpg数据集 #图形属性映射:发动机尺寸对应x轴,耗油量对应y轴。 #散...
自定义控件之绘图篇:Paint之函数大汇总
一、基本用法 1、概述 我们先来看一下paint中基本设置的函数都有哪些: reset() 重置画笔 setColor(int color) 给画笔设置颜色值 setARGB(int a, int r, int g, int b) 同样是设置颜色,但是利用ARGB分开设置 setAlpha(int a) ...

自定义控件之绘图篇:Paint之ColorMatrix与滤镜效果
一、矩阵概述 1、定义 称为m*n矩阵 2、矩阵乘法 矩阵乘法其实并不难,它的意思就是将第一个矩阵A的第一行,与第二个矩阵B的第一列的数字分别相乘,得到的结果相加,最终的值做为结果矩阵的第(1,1)位置的值(即第一行,第一列)。 同样,A矩阵的第一行与B矩阵的第二列的数字分别相乘然后相加,结果做为结果矩阵第(1,2)位置的值(即第一行第二列)。 再如,A矩阵的第二行与B矩阵...
自定义控件之绘图篇(二):路径及文字
一、创建路径 canvas中绘制路径利用: void drawPath (Path path, Paint paint) 1、直线路径 void moveTo (float x1, float y1):直线的开始点;即将直线路径的绘制点定在(x1,y1)的位置; void lineTo (float x2, float y2):直线的结束点,又是下一次绘制直线路径的开始点;lineTo()可以一直...
猜你喜欢
自定义控件之绘图篇(四):canvas变换与操作
一、平移(translate) canvas中有一个函数translate()是用来实现画布平移的,画布的原状是以左上角为原点,向左是X轴正方向,向下是Y轴正方向,如下图所示 translate函数其实实现的相当于平移坐标系,即平移坐标系的原点的位置。translate()函数的原型如下: void translate(float dx, float dy) 参数说明: float dx:水平方向...

自定义控件之绘图篇(二):路径及文字
一、创建路径 canvas中绘制路径利用: void drawPath (Path path, Paint paint) 1、直线路径 void moveTo (float x1, float y1):直线的开始点;即将直线路径的绘制点定在(x1,y1)的位置; void lineTo (float x2, float y2):直线的结束点,又是下一次绘制直线路径的开始点;lineTo()可以一直...

WPF自定义控件之图形解锁控件 ScreenUnLock
ScreenUnLock 与智能手机上的图案解锁功能一样。通过绘制图形达到解锁或记忆图形的目的。 本人突发奇想,把手机上的图形解锁功能移植到WPF中。也应用到了公司的项目中。 在创建ScreenUnLock之前,先来分析一下图形解锁的实现思路。 1.创建九宫格原点(或更多格子),每个点定义一个坐标值 2.提供图形解锁相关扩展属性和事件,方便调用者定义。比如:点和线的颜色(Color),操作模式(C...
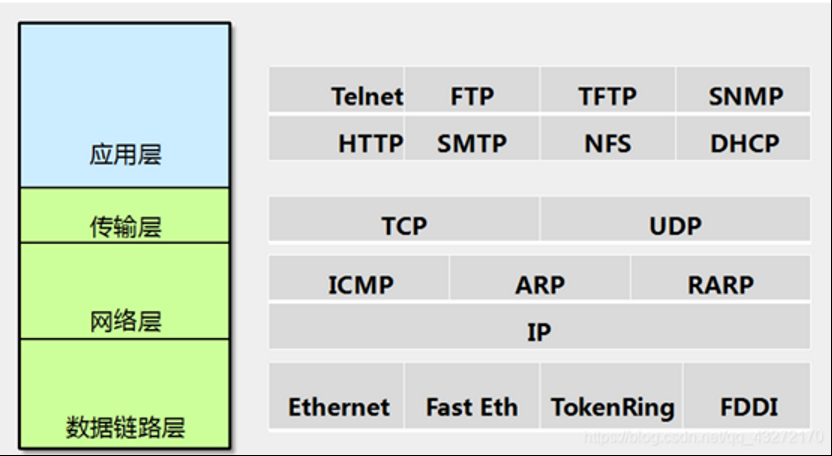
网络应用层概述 -- 概念与结构
1. 概念 应用层,在集成的是7层模型中的表示层,会话层,应用层的总和,在TCP/IP三层模型中的最高层,其实现的协议包括TFTP,HTTP,SNMP,FTP,SMTP,DNS,Telnet等 作用: 每个应用层协议都是为了解决某一类应用问题,而问题的解决是通过位于不同主机中的多个应用进程之间的通信和协同工作来完成的。应用层的具体内容就是规定应用进程在通信时所遵循的协议。 2 . 层...

自定义控件之绘图篇(一):概述及基本几何图形绘制
一、Paint与Canvas 像我们平时画图一样,需要两个工具,纸和笔。Paint就是相当于笔,而Canvas就是纸,这里叫画布。 所以,凡有跟要要画的东西的设置相关的,比如大小,粗细,画笔颜色,透明度,字体的样式等等,都是在Paint里设置;同样,凡是要画出成品的东西,比如圆形,矩形,文字等相关的都是在Canvas里生成。 下面先说下Paint的基本设置函数: paint.setAntiAlia...
问答精选
delete a specific row with where clause in sqlite for android
I try to delete a specific row with where clause in sqlite for android but it not working plz any body help. try this :...
UIImageview Programmatically in swift
I'm just trying to create a UIImage View programmatically, I have a new view and I tried doing this This code doesn't work. please help me as soon as possible This is for image with 100 height and 100...
nsISocketTransportService using Firefox addon sdk
I'm trying to use Firefox to read the SSH banner. ie. when you initially connect to an SSH server the server sends you its banner, identifying the server software and you send the SSH server your bann...
Unable to customize html range input
I need to customize the range input. The slider must be green for the lower part(the area which the thumb has moved) and the remaining should be grey. Basically I have changed the default styles from ...
Counting the number of occurrences
I have the following problem. I want to count the number of occurrences of values that are smaller or equal to zero. Example in the following data I have 3 occurrences 1(0,0,0),2(-1,-2),3(0,0). Is the...
相关问题
相关文章
热门文章
- Tensor flow / 自製MNIST資料 / 抗飄移#2 / 實驗筆記
- Springboot工程使用第三方jar包中resources下的配置文件未生效问题
- 基于 Gitlab 和 Kubernetes 的 CI/CD 实践
- Windows下MQTT代理服务器的搭建
- CAN中继解决西门子FT1810火灾显示盘通讯距离不够的案例介绍
- HAL库学STM32 关于定时器的几个问题
- 循环神经网络学习笔记
- jsp错误: "javax.servlet.http.HttpServlet" was not found on the Java Build Path
- 基于bert的评论文本情感分析
- 李宏毅 机器学习笔记 Brief Introduction of Deep Learning
推荐文章
相关标签
推荐问答
- Beautiful Soup returning empty html
- Spring MVC equivalent of getText() from Struts for I18N
- Google Sign-In set gapi.auth2.init in Angular2
- 45 degree tilt is shown, then it's immediately switched to 0 degree view, it's happening on some locations, why?
- Can't draw more than one boxplot per group. Did you forget aes(group = ...)?
- What are the benefits of not using cPickle to create a persistent storage for data?
- Quotes and double quotes always escaped when retrieve from table? How can I fix this?
- React interface: Promise works but objects are still "is not defined"
- Pika: What's the effect of parameter heartbeat in connection?
- Human readable DhcpInfo.ipAddress?